I think they had a song with lyrics similar to this!!
Anyway, hubby went and picked up my Silhouette for me today. I got home from work, took care of the banking stuff and then began to play. I made my first cut and boy, is the machine a bit noisy. It also came with a downloadable card so I could buy some templates etc.
I am making wedding invitations for a friend and I have to cut out 60 hearts to "burnish velvet" on them. I was not looking forward to that at all. The Silhouette even has a heart template almost identical to what I am going to use - with a bit of modification - voila! I will have the perfect heart template and the machine will cut 60 for me.
I have a few more chores to clean up and then I can finally get around to posting this year's Christmas cards!
Hope everyone is having a great day!
I enjoy a number of crafts from beading jewelry, sewing, crochet, knitting through to card making. I have dabbled in digital scrapbooking but I have not yet worked on the paper kind....give me time!
Monday, January 26, 2009
Saturday, January 24, 2009
Craft room area
My new Silhouette has arrived - small glitch. The post office in Point Roberts is not open on Saturday so I have to wait until Monday to pick it up. Wahh! I want to play!
Oh well, at least I finally finished my craft area. Some crafters are lucky to have a separate room - I have the dining area. Mind you, I don't mind being close to the hubbub of the family and not isolated. I spend a lot of time either on the computer or at my craft table and I like being close to everyone at the same time.

Happy crafting and I hope everyone has a great day!
Cathy
Oh well, at least I finally finished my craft area. Some crafters are lucky to have a separate room - I have the dining area. Mind you, I don't mind being close to the hubbub of the family and not isolated. I spend a lot of time either on the computer or at my craft table and I like being close to everyone at the same time.

Happy crafting and I hope everyone has a great day!
Cathy
Monday, January 19, 2009
I am so excited....so excited...
I just bought a Silhouette Digital Craft Cutter! I never heard of the machine until Saturday and I went home to "Google" what this machine was....I just had to have one!
Thanks to an MVA my wrists are shot and I have lost most of my fine-motor skills...so, cutting little things is very difficult - no longer! I can't wait, I can't wait, I can't wait - hold it, do I sound excited? I should never have opened the fortune cookie Saturday night - it said I should buy a new product....
Prices ranged from the ridiculous in Canada ($446.00) to very reasonable (even with the exchange rate) in the US ($181.00). This was right in my budget and shipping was free to the parcel drop box just across the border (love living so close).
Now I have to wait for a week or two to get it....but, I do get to play with all the Cuttlebug stuff that came today from Crop Shop, and my newly organized papers, and my Nestabilities...
I hope everyone is having a great day!
Cat
Friday, January 16, 2009
Scrapbook room...
I have finished my paper storage system and I am in the middle of re-organizing my craft area (aka unused dining area). I have been taking photos and I will get them posted as soon as I have finished.
I picked up another member of the "Nestabilites" - this time the large and small label set. I can't wait to finally be able to play with them.
Have a great day!
I picked up another member of the "Nestabilites" - this time the large and small label set. I can't wait to finally be able to play with them.
Have a great day!
Tuesday, January 13, 2009
Scrapbook paper storage....
OUCH! I have got my shelves together. Watch out for those zap-straps! I have cuts on both hands from these things. I finally got smart (after I got two cuts), went to the garage, raided my hubby's tool box and came back with pliers and cutters. I used the pliers to pull the zap-straps tight and then I cut them.
What the instructions didn't say was to do one complete row at a time and make sure all straps are really tight before cutting them off.
As soon as I have the mess (papers, books, tools etc.) cleaned up I will post pictures of my shelf and new crafting area.
I should never have started "Googling" crafting areas. I only wanted information on how to store punches - which led to "how to store stamps", which led to "how to store ink pads", which led to "how to store paper" and it snowballed from there. However, I am really excited with the progress I have so far.
Only one problem - I will be going to all this trouble when it may need to be dismantled in a couple of months if we decide to sell and move!
Oh well, at least I will have a few months of happy crafting before that happens. Hope everyone is having a great day...
Thursday, January 8, 2009
Blog Candy!!!
Never heard of it before tonight. Glad I continued surfing until Gray's Anatomy comes on.
Here is the link to the blog candy offered by Lim:
http://lim-thevoicesinmyheadlimblog.blogspot.com/2009/01/hanglar-and-whipper-snapper-blog-candy.html
Here is the link to the blog candy offered by Lim:
http://lim-thevoicesinmyheadlimblog.blogspot.com/2009/01/hanglar-and-whipper-snapper-blog-candy.html
Scrapbook paper storage solutions...
Man, I have spent two days "googling" for a stacking system to store my paper. Thanks to Michael's "3 for 1" sales I have quite a selection and running out of room. There are no shortage of ideas and products except for two things: 1) The price is outrageous or, 2) The shipping charges to Canada are more than the product.
I came across a blog and, with Emilie's permission, I am posting the blog and putting a link under "My Blog List" to her website. Thanks Emilie, both for the permission and the incredible idea. Trust me, I will be shopping in the next day or two for the wire cubes. However, this is Canada and not everything makes it across the border!
-------------------------------------------------------------------------------------------------
Make Your Own Paper Storage Rack
Here's a tutorial I posted over at Craft Critique and thought I would share with you fabulous blog readers as well. Let me know what you think!
If you're a scrapbooker you know about 'Scrap Spaces'. You've seen the scrap rooms of the Scrap Celebs. In magazines, online, on blogs...these amazing rooms with custom built-in shelves for each little brad and eyelet. Skylights. Endless work space. Cute little inspirations.
I love seeing these rooms, but they are far from my reality. With two kids and a husband in Masters school, I spent my nights scrapping in a dimly lit, damp and cold, unfinished basement (read: Dungeon) and my scrap storage consisted of whatever I could find on the cheap and make work! Then I stumbled onto this fantastic paper storage solution that improved my organization by leaps and bounds! This is a great solution for anyone....not just the starving college student!
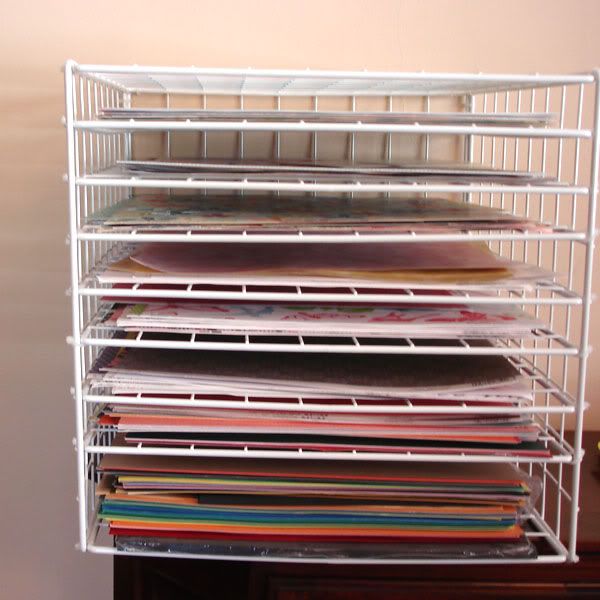
By slightly modifying white wire storage grids you can create a personalized paper storage system which will hold any amount of 12x12 papers in an efficient and very organized way. And it's wicked cheap. I'll go through the steps of making your own here.
What you'll need...
1 box Wire Storage Grids (available at Target and Walmart) cost: $15-20
1 package Zip/Cable Ties (available at any home improvement store) cost: $1-2
1 wire cutter or seriously heavy duty scissors

{Make sure your grids measure at least 12" square so your paper will fit. Mine are 13" square...perfect.}
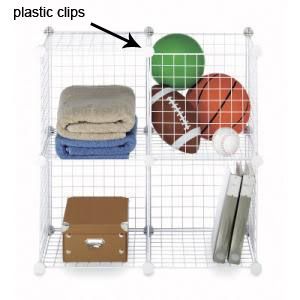
1. Start by throwing out the weird little white plastic clips that come with the cubes. You won't be needing these.
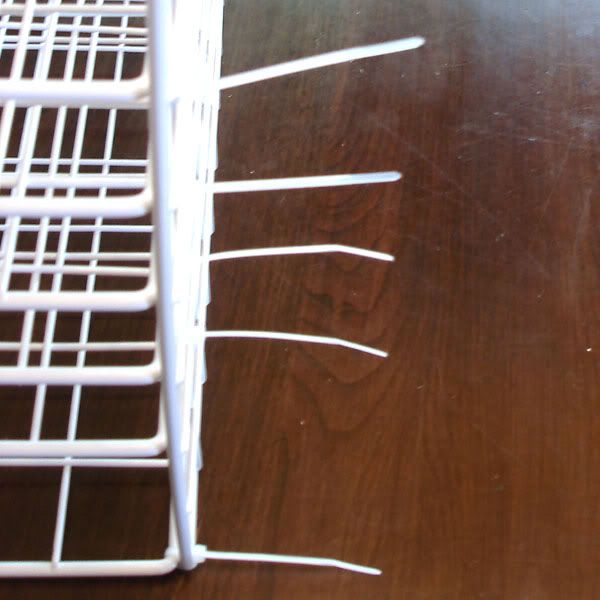
3. Next take the remaining white shelves and slide them into your cube and attaching them at 1 inch intervals where the grid already exists. If you need a larger slot for some paper sets just make it a 2 or 3 inch interval instead.
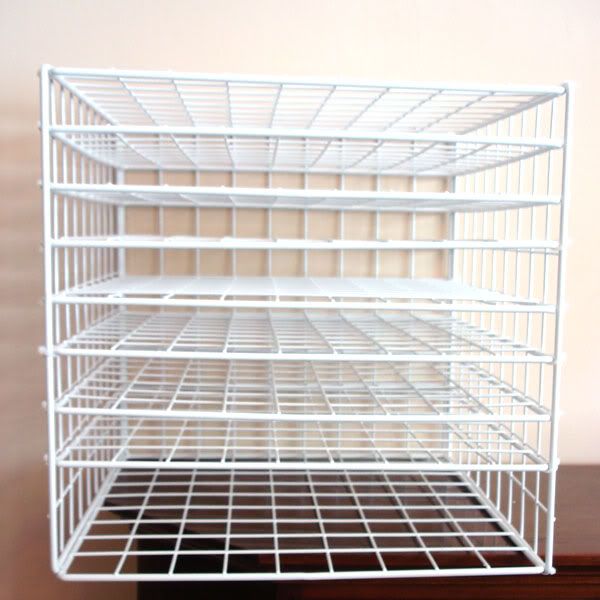
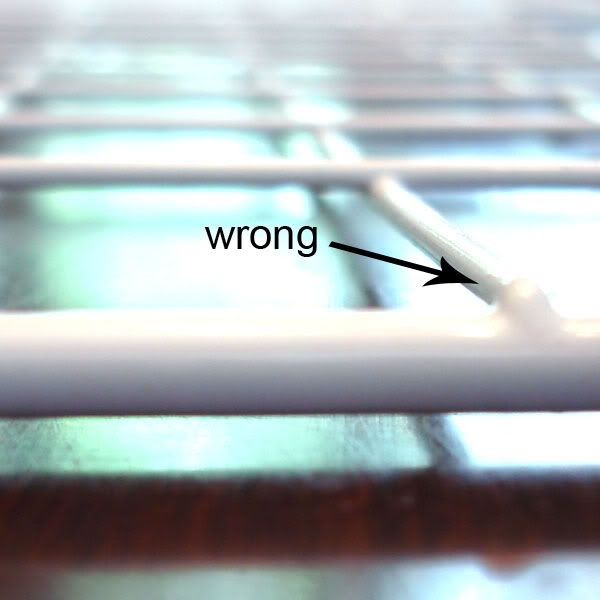
Make sure when you slide a shelf in that the wire grids are on the underside so that you get a slight lip on your paper tray. (photo below)
4. Use your wire clippers to remove excess plastic end from zip ties.

Fill with paper sorting by color, manufacturer or whatever makes you happy! Voila! Isn't it genius?!! I made 3 separate cubes out of 2 boxes of these grids and had some grid pieces leftover. I have even given these cubes as gifts to fellow scrapbookers with rave reviews!
-------------------------------------------------------------------------------------------------
I came across a blog and, with Emilie's permission, I am posting the blog and putting a link under "My Blog List" to her website. Thanks Emilie, both for the permission and the incredible idea. Trust me, I will be shopping in the next day or two for the wire cubes. However, this is Canada and not everything makes it across the border!
-------------------------------------------------------------------------------------------------
Make Your Own Paper Storage Rack
Here's a tutorial I posted over at Craft Critique and thought I would share with you fabulous blog readers as well. Let me know what you think!
If you're a scrapbooker you know about 'Scrap Spaces'. You've seen the scrap rooms of the Scrap Celebs. In magazines, online, on blogs...these amazing rooms with custom built-in shelves for each little brad and eyelet. Skylights. Endless work space. Cute little inspirations.
I love seeing these rooms, but they are far from my reality. With two kids and a husband in Masters school, I spent my nights scrapping in a dimly lit, damp and cold, unfinished basement (read: Dungeon) and my scrap storage consisted of whatever I could find on the cheap and make work! Then I stumbled onto this fantastic paper storage solution that improved my organization by leaps and bounds! This is a great solution for anyone....not just the starving college student!
By slightly modifying white wire storage grids you can create a personalized paper storage system which will hold any amount of 12x12 papers in an efficient and very organized way. And it's wicked cheap. I'll go through the steps of making your own here.
What you'll need...
1 box Wire Storage Grids (available at Target and Walmart) cost: $15-20
1 package Zip/Cable Ties (available at any home improvement store) cost: $1-2
1 wire cutter or seriously heavy duty scissors

{Make sure your grids measure at least 12" square so your paper will fit. Mine are 13" square...perfect.}
1. Start by throwing out the weird little white plastic clips that come with the cubes. You won't be needing these.


3. Next take the remaining white shelves and slide them into your cube and attaching them at 1 inch intervals where the grid already exists. If you need a larger slot for some paper sets just make it a 2 or 3 inch interval instead.

Make sure when you slide a shelf in that the wire grids are on the underside so that you get a slight lip on your paper tray. (photo below)

4. Use your wire clippers to remove excess plastic end from zip ties.

Fill with paper sorting by color, manufacturer or whatever makes you happy! Voila! Isn't it genius?!! I made 3 separate cubes out of 2 boxes of these grids and had some grid pieces leftover. I have even given these cubes as gifts to fellow scrapbookers with rave reviews!

Pros:
- Inexpensive
- Customizable to include large and small shelf heights
Cons:
- May be hard to see certain papers since there is no graduation.
-------------------------------------------------------------------------------------------------
Tuesday, January 6, 2009
Greetings from a rookie...
My first blog - my first post.
A friend told me that we needed a hobby, so - a few dollars later we started making jewelry. I wish Michael's took Air Miles cards - I would be able to fly anywhere in the world for free!
Debbie is a die-hard "scrapbooker" and she had tried for years to get me into it - I am more into the computer graphics end of things. However, last year I bought a rubber stamp, made my first Christmas card and it took off from there. I now have quite a few stamps, made a number of different cards, took a glitter course and now I am off and running.
Christmas I got a Cuttlebug and two sizes of Xyrons - my hubby says I am a "tool junkie"!
I look forward to learning how to use these and posting some of my efforts.


